Fields

Previous  Next |  Direct link to this topic

Each field will be described in the following sections.

Field

Description

Form type

Each configuration will need a unique form type in order to function. It is not possible to add a configuration for a form type the already exist (Only one configuration per form type).


The form type is found by opening the form you need form type for. Activate the system information (View > System information), and the information is displayed in the bottom left corner of the client when you hold the mouse over an item.

image269

image270

Tip: You can specify FormType as -1 in order to have the configuration to all screens (except the screens that have their own Right-click Configuration)

Description

This is a simple description of the form type. The information only used on the configuration window.

On the most common form types, this description appears automatically.


Users (configuration)

Here you have the option via the edit text and radio buttons make configurations user-specific. (making it possible to hide the configuration for certain users)


Example:

image115

The above screenshot result in that only the two users with user codes “user1” and “user2” will see this configuration, while the screenshot below makes the configuration active to all other users except

image116


Users (menu)

Works like the user fields for the configuration but on the single menu item.

NB: PLEASE NOTE THAT ONLY USERS THAT ARE INCLUDE IN BOTH THE IN THE CONFIGURATION AND MENU SETTING ARE SHOWN THE MENU

Active(configuration)

Here you have the option to temporarily deactivate a configuration instead of removing it entirely.
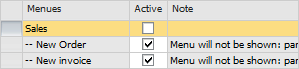
Active(Menu)

Here you have the option to temporarily deactivate a menu instead of removing it entirely. If a menus header is inactive the menu will not be shown.

image271

NB: PLEASE NOTE THAT IF A MENU IS INACTIVE ALL ITS CHILDREN WILL NOT BE SHOWN.

Category

Here you define if you wish to categorize your configuration. Categorization is optional and you can read more about it in the manual section describing Configuration categorization.

Caption

Here you enter the Caption of the selected menu-item

Icon (Optional)

The path to the image there should be shown next to the menu item text. The icon should be BMP and 16x16 Pixels

Mode

Here you decide which modes the Menu-item should appear in (example: if you have a menu-item on BP Master Data and it should only be able to be used while the BP Screen is in OK Mode you would uncheck Add and Find)

Function type

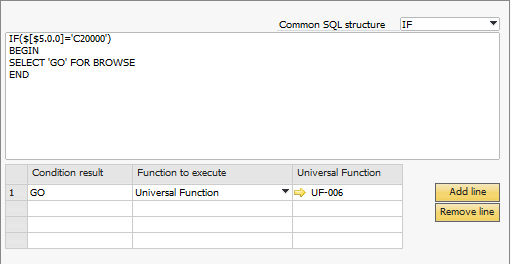
A menu configuration can be either simple or conditional. If the function type is simple, the chosen function to execute will always execute when the menu is activated.

image272

[See a video of the feature]


Field

Description


Function to execute

Decides with function should be executed every time the menu is activated

UF-code

If the function to execute is sat to universal function this field tells witch function is executed

If the function type is conditional, you have option to use SQL to control if the Menu-item is displayed or not (only displayed if one of the condition results are met) or make a single menu-item do different things based on a condition.

Example 1
image273
(In this configuration the menu-item will only show and run if Business Partner has CardCode "C20000")


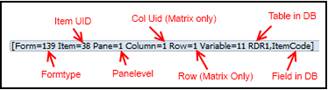
It is also possible here to use special keywords $[CURRENT_ITEM], $[CURRENT_COLUMN] and $[CURRENT_ROW] to control if the menu-item should only be shown if certain GUI-elements have been was right-clicked.

clip0204
(In this configuration the menu-item will only show and run if the Items Matrix on a document is right-clicked (aka will not be shown it you right-click any other GUI-element))

NB: PLEASE NOTE THAT THE CONDITION-RESULTS ARE CASE-SENSITIVE

NB: IN SAP HANA IT IS NOT POSSIBLE TO MAKE SQL IF/ELSE SENTENCES. INSTEAD USE THE SELECT CASE … FROM DUMMY SYNTAX

Find/Add/OK Checkboxes


These checkboxes control in which modes the menus should be shown.


NB: BE SURE THAT HEADER MENU ARE SHOWN IN THE SAME MODES AS IT’S SUBMENUS OR THE SUBMENUS WILL NOT BE SHOWN.

Function to execute

For each menu you can bind one of the 20+ functions available. These are:

Function

Description

Opportunity

Opens the Opportunities. In special windows, like the Business Partner Master data window, it will draw the BP-code to the new opportunity so you do not need to type it yourself.

Blanket Agreement

Opens the Sales/Purchase Blanket Agreement. In special windows, like the Business Partner Master data window it will draw the BP-code to the new Agreement so you don’t need to type it yourself. If unable to determine a type, the add-on will ask you which type you want to open.

Quotation

Opens the Sales/Purchase Quotation. In special windows, like the Business Partner Master data window it will draw the BP-code to the new Quotation so you don’t need to type it yourself. If unable to determine a type, the add-on will ask you which type you want to open.

Order

Opens the Sales/Purchase Order window. In special windows, like the Business Partner Master data window, it will check the type of the current BP and open the respected window type (Sales Order for Customers and Purchase Order for Suppliers). This will draw the BP-code to the new Sales/Purchase Order so you don’t need to type it yourself. If unable to determine a type, the add-on will ask you which type you want to open.

Delivery/Goods Receipt PO

Opens the Delivery/Goods Receipt window. In special windows, like the Business Partner Master data window, it will check the type of the current BP and open the respected window type and draw the BP-code to the new window. If unable to determine a type, the add-on will ask you which type you want to open.

Return/Goods Return

Opens the Return/Goods Return window. In special windows, like the Business Partner Master data window, it will check the type of the current BP and open the respected window type and draw the BP-code to the new window. If unable to determine a type, the add-on will ask you which type you want to open.

Down Payment

Opens the Sales/Purchase Down Payment window. In special windows, like the Business Partner Master data window, it will check the type of the current BP and open the respected window type and draw the BP-code to the new window. If unable to determine a type, the add-on will ask you which type you want to open.

Invoice

Opens the AP/AR Invoice window. In special windows, like the Business Partner Master data window, it will check the type of the current BP and open the respected window type and draw the BP-code to the new window. If unable to determine a type, the add-on will ask you which type you want to open.

Credit Note

Opens the AP/AR Credit Note window. In special windows, like the Business Partner Master data window, it will check the type of the current BP and open the respected window type and draw the BP-code to the new window. If unable to determine a type, the add-on will ask you which type you want to open.

Activity

Opens the Activity. In special windows, like the Business Partner Master data window, it will check the type of the current BP and transfer it.

Incoming Payment

Opens the incoming payment window. In special windows, like the Business Partner Master data window it, will draw the BP-code to window so you don’t need to type it yourself (also determines type).

Outgoing Payment

Opens the outgoing payment window. In special windows, like the Business Partner Master data window, it will draw the BP-code to window so you don’t need to type it yourself (also determines type).

Posting Periods

Open the General Setting and set the focus on the Posting Periods tab-page.

Reconciliation

Open the Banking Reconciliation window.

Goods Receipt

Opens the Goods Receipt window. On special windows, like the Item Master Data, the active Item code will be draw onto the new window and be placed as a line so you don’t need to type it yourself.

Goods Issue

Opens the Goods Issue window. On special windows like the Item Master Data the active Item code will be draw onto the new window and be placed as a line so you don’t need to type it yourself.

Inventory Transfer

Opens the Inventory Transfer window. On special windows like the Item Master Data the active Item code will be draw onto the new window and be placed as a line so you don’t need to type it yourself.

Last Price Report

Opens the Last Price Report window. On special windows, like the Item Master Data, the active Item code will be draw onto the new window for easy use.

Special Prices

Opens the BP Special Prices window. On special windows, like the documents and BP Master data, the BP code will be draw onto the new window for easy use.

Discount Groups

Opens the Discount Groups window. On special windows, like the documents and BP Master data, the BP code will be drawn onto the new window for easy use.

Aging

Opens the Aging. On special windows, like the documents and BP Master data, the BP code will be draw onto the new window for easy use.

Universal Function

Enables you to activate a Universal Function from a function button. Which button to activate is chosen in the universal function field for the button (Press TAB to choose)

Do Nothing

Creates a menu there does nothing is include to make it easier to make header menus

UF-Code

If you set the Function to execute to Universal Function then this field need to specify which UF to run (Else you can leave it blank)

Import

This allows you to import configurations (Either one at the time or as a batch). See more info in under “Configuring the Add-on > Shared functionality > Import“

Export

This allows you to export configurations to XML (Either one at the time or as a batch). See more info in under “Configuring the Add-on > Shared functionality > Export“