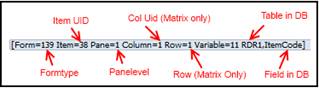
Which items are mandatory for which windows are configured using the Mandatory Fields: Configuration which is located in Administration > Add-ons > B1 Usability Package > Module Configuration.
Field |
Description |
||||||||||||||||
|---|---|---|---|---|---|---|---|---|---|---|---|---|---|---|---|---|---|
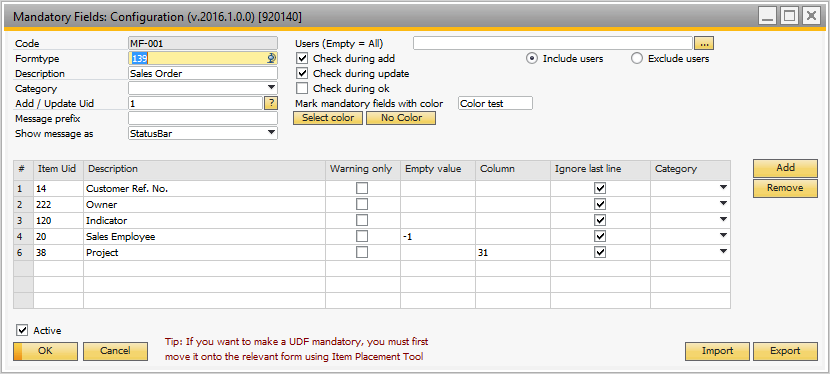
Code |
Each configuration will need a unique code in order to function. When you switch to add-mode the system will automatically suggest a code (MF-001, MF-002, and so on). |
||||||||||||||||
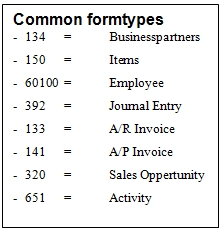
Form type (Mandatory)
|
|
||||||||||||||||
Description |
This is a simple description of the form type. The information is not used elsewhere in the add-on. On the most common form types this description appears automatically. |
||||||||||||||||
Add / Update Uid |
This field allows you to define which item is the Add / Update button of the configured form. Throughout SAP Business One almost every Add/Update is ‘1’, but in a few special cases (Employee Master Data, Service Calls, Customer Equipment Card and Service Contract among other) the Add/Update button have special item Uids. |
||||||||||||||||
Check during add (Default checked) |
Determines if the mandatory field check should be active during add-mode. You can turn this off during debug and in special cases. |
||||||||||||||||
Check during update (Default Checked) |
Determines if the mandatory field check should be active during update mode. You can turn this off during debug and in special cases. NB. IN DOCUMENTS WHICH ARE NOT EDITABLE, THIS CAN BE HANDY TO TURN OFF SINCE PRE-ADD-ON DOCUMENTS MIGHT NOT APPLY TO THE RULES OF THE MANDATORY FIELD CHECK DURING UPDATES OF COMMENTS, AND SO ON. |
||||||||||||||||
Check during OK (Default Unchecked) |
Determines if the mandatory field check should be active during OK mode (useful if you wish to make selection criteria on report windows mandatory). |
||||||||||||||||
Mark with color |
Using this option, you will be able to provide a visual representation of what field you have marked with a color. Default is no color, but you can choose between different colors (both the background color and the text color). The preview field on the right give you a sample on how the color will be shown.
NB: Due to SDK Limitations, Colors are not shown in Browser Access TIP: IF YOU NEED THE OLD LEGACY COLORS FROM PREVIOUS VERSION THEY ARE DISPLAYED IN THE COLOR DIALOG AS CUSTOM COLORS |
||||||||||||||||
Users |
Here you have the option via the edit text and the radio buttons to make your configurations user-specific (making it possible to have one user have one unique configuration while another user have a different configuration)
The above screenshot result in that only the two users with user codes “user1” and “user2” will see this configuration, while the screenshot below makes the configuration active to all other users except
NB: IT IS YOUR RESPONSIBILITY THAT A USER DOES NOT OVERLAP OR IS INCLUDED IN TWO OR MORE CONFIGURATIONS. IF THAT IS THE CASE, THE SYSTEM WILL WORK WITH THE FIRST CONFIGURATION IT FINDS AND IGNORE THE ADDITIONAL CONFIGURATIONS |
||||||||||||||||
Message prefix |
here you can make a custom prefix to the message there is shown if a mandatory field is missing. this prefix will replace the original prefix "the following fields are mandatory"
Example: No prefix:
With prefix
|
||||||||||||||||
Show message as |
here you can decide how the mandatory fields error message should be shown to the user |
||||||||||||||||
Active |
Here you have the option to temporarily deactivate a configuration instead of removing it entirely. |
||||||||||||||||
Import |
This allows you to import configurations (Either one at the time or as a batch). See more info in under “Configuring the Add-on > Shared functionality > Import“ |
||||||||||||||||
Export |
This allows you to export configurations to XML (Either one at the time or as a batch). See more info in under “Configuring the Add-on > Shared functionality > Export“ |
||||||||||||||||
Add line button |
Add an additional mandatory field line. |
||||||||||||||||
Remove line button |
Remove the selected line(s). Select a line by pressing the grey block. Use CTRL or SHIFT to select multiple lines. |
||||||||||||||||
The Lines |
The lines contain the data about the mandatory fields. Add and Remove lines are handled by the buttons described above.
|