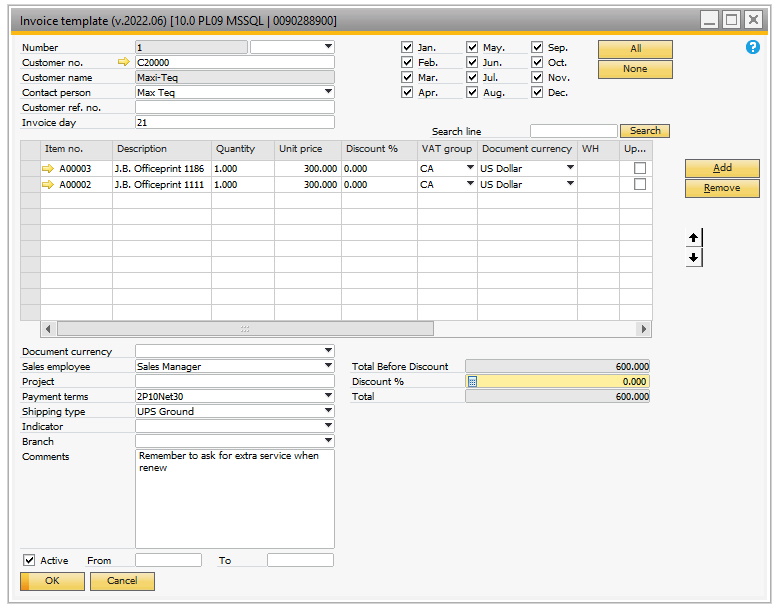
First thing you need to do is to create the invoice templates that you wish to be part of the batch run. The templates are located in Sales A/R > Recurring Invoices > Invoice Templates.
Field |
Description |
|||||||||||||||||||||||||||||||||||||||||||||||||||||||||||||||
|---|---|---|---|---|---|---|---|---|---|---|---|---|---|---|---|---|---|---|---|---|---|---|---|---|---|---|---|---|---|---|---|---|---|---|---|---|---|---|---|---|---|---|---|---|---|---|---|---|---|---|---|---|---|---|---|---|---|---|---|---|---|---|---|---|
Number |
This is the number of the template. These are assigned automatically |
|||||||||||||||||||||||||||||||||||||||||||||||||||||||||||||||
Document series |
The combo box just right to the number is the document series field. Here you can assign the invoice a specific document series. |
|||||||||||||||||||||||||||||||||||||||||||||||||||||||||||||||
Customer number, name and Contact person |
Here you choose the Business Partner the invoice template is linked to. Press Tab to choose from a list. After selection, you can choose a contact person for the invoice. |
|||||||||||||||||||||||||||||||||||||||||||||||||||||||||||||||
Customer Ref. Number |
Here you can set a customer ref. number that will appear on the invoice. |
|||||||||||||||||||||||||||||||||||||||||||||||||||||||||||||||
Invoice day |
Here you choose which day of the month the invoice should be posted. Using invoice days, you can have multiple invoice groups in a month (10 invoices on the 1st and 5 invoices at the 20th of the month). NB. Since not every month have 31 days, setting an invoice day to 31 might give unexpected results. 30 is a better choice. A special exception is February that have 28 or 29 days depending if it is a leap year. If 30 set for February it will create the invoice on the last day (28 or 29) |
|||||||||||||||||||||||||||||||||||||||||||||||||||||||||||||||
Months |
By using the checkboxes, you can set which months of the year the invoice should be created. This way, you can make an invoice monthly, quarterly, yearly or custom months. You can use the All and None button to quickly check or uncheck all months. |
|||||||||||||||||||||||||||||||||||||||||||||||||||||||||||||||
Document Currency |
If the Business Partner selected in the template is multi-currency, then it is possible to choose the currency that the document should be in. |
|||||||||||||||||||||||||||||||||||||||||||||||||||||||||||||||
Sales Employee |
Here you can set the header sales employee of the invoice (BP’s default is selected when choosing Business Partner but can be overridden). |
|||||||||||||||||||||||||||||||||||||||||||||||||||||||||||||||
Project |
Here you can set the project of the invoice (BP’s default is selected when choosing Business Partner but can be overridden). |
|||||||||||||||||||||||||||||||||||||||||||||||||||||||||||||||
Payment Terms |
Here you can set the payment terms of the invoice (BP’s default is selected when choosing Business Partner but can be overridden). |
|||||||||||||||||||||||||||||||||||||||||||||||||||||||||||||||
Shipping Type |
Here you can set the shipping type of the invoice. |
|||||||||||||||||||||||||||||||||||||||||||||||||||||||||||||||
Indicator |
Here you can choose the indicator of the invoice BP’s default is selected when choosing Business Partner but can be overridden). |
|||||||||||||||||||||||||||||||||||||||||||||||||||||||||||||||
Branch |
Here you can choose what branch the Invoice should be related to |
|||||||||||||||||||||||||||||||||||||||||||||||||||||||||||||||
Comments |
Here you can write your comments that are transferred to the invoice. |
|||||||||||||||||||||||||||||||||||||||||||||||||||||||||||||||
Discount % |
Here you can set the invoice discount %. |
|||||||||||||||||||||||||||||||||||||||||||||||||||||||||||||||
Active |
This checkbox allows you to make a template inactive instead of removing it completely. This is useful when you as an example do a service on a monthly basis, but for some reason do not need the service. Using the report described later you can quickly locate inactive templates. |
|||||||||||||||||||||||||||||||||||||||||||||||||||||||||||||||
From / To |
Here you have the option to set an overall period that the invoice template is active. You have the option to enter none, one or both fields. Default is no dates. |
|||||||||||||||||||||||||||||||||||||||||||||||||||||||||||||||
Template lines |
These lines works like normal A/R invoice lines would work, where you choose an item, enter its quantity, price and so on. The most essential but not all (70+) columns are included. Special Column: Unit Price When an item is added to a template or the price of an item is updated automatically, the customer’s price after discount is inserted (using special prices etc.). The discount field is not changed when this happens. The columns can be edited as other columns and are transferred as expected to the invoice. Special Column: Update [See a video of the feature] This update column check indicates if the item on the line should be updated with the latest data from its master data. The data that will be updated depends on what you have marked as updateable in the configuration: • Item description • Price and Currency • Tax-group • Sales Employee The updates of template lines can be done manually using the update lines menu item, and during the invoice Wizard you’ll be prompted if you want to update the invoices about to be invoiced. (You will be prompted to A: Update lines and run the wizard, B: Do not update the line and run wizard or C: Abort Invoice Wizard) Special Column: Description [See a video of the feature] Description normally shows the items description, but you have the option to add you own text instead (Information on the invoice.). The text you can enter can include the following dynamic parts.
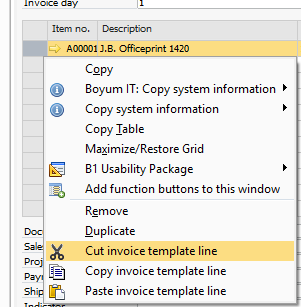
Special Feature: Cut/Copy/Paste Lines [See a video of the feature] If you right-click on the row-header of a line you get the option to cut/copy an entire line. You can afterward right-click on the same or other Invoice template and paste the line in.
NB: PLEASE NOTE THAT THESE KEYWORDS ARE CASE SENSITIVE |
TIP: YOU ARE ABLE TO CONVERT ALREADY EXISTING INVOICES INTO TEMPLATES. JUST FIND THE INVOICE YOU WOULD LIKE AS A TEMPLATE, RIGHT CLICK AND CHOOSE THE MENU ITEM “SAVE AS RECURRING INVOICE”