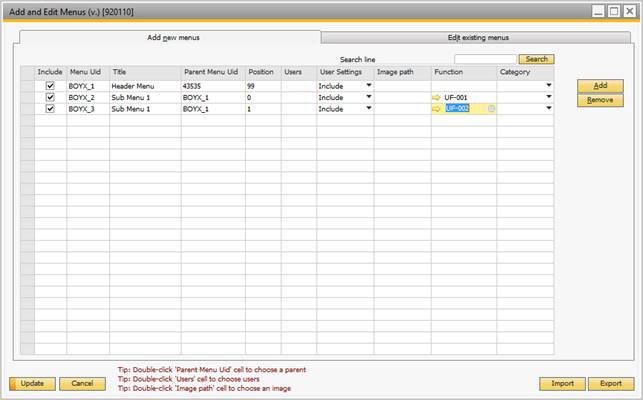
As shown above, you can add entries to create new menus here. This is done by clicking the Add button to create a new row, and then just filling out the data needed to create your menu/menu item. The first thing to do is to give your menu/menu item a unique Id. It is important that you use unique Id’s for your menus and menu items, as they are used to refer to a specific entry. When this is done, a display title is chosen. To find the Parent Menu Uid, which is used to determine where to place your newly created menu/menu items, go to View and check system Information. This will make SAP display the Uid’s of a menu/menu item, on mouse over, in the lower left corner, like shown below. If you want to add something to the main menu, you have to go to the top menu called Modules, and do a mouse over to find the Uid. In the above example we are using the Reports menu as parent for our BOYX_1.

Video: Click here to watch more information on how to find menu-uids.
After Menu Uid, Title and Parent Menu Uid has been filled out, you have to give your menu/menu item a position. This is used to determine where to place the menu/menu item. Position 0 is the topmost position, but if you want a different one, the easiest way is to count it.
It is possible to enable specific menus/menu items for specific users. This is done by typing in usernames in the User column separated by a ; for each user. You can choose either to include or exclude the users specified, whatever is easiest. If you want to enable this for all users, just leave the Users column blank, and forget about the User Settings. The last column is only filled out for menu items that you want to execute a universal function. This is done by standing in the field and pressing Tab, to use a “choose from list” to select the wanted universal function.
You also have the option to add an image to the menu-item. Just enter a path to an image (Example: \\server\red.bmp) or double-click on the cell to choose an image.
In the Include column you can choose whether or not you want your menu to be activated. This is done by checking and unchecking the checkbox.
NB: ONLY JPG, JPEG AND BMP IMAGES ARE SUPPORTED. THE IMAGE SHOULD BE 16X16 PIXELS. ALSO ONLY TOP-LEVEL MAIN-MENU ENTRIES AND TOP-MENU ENTRIES WILL SHOW ITS IMAGE.
TIP: THE TRANSPARENT IMAGE COLOR IN SAP IS RGB(192,220,192 = LIGHT GREEN) HEX: #C0DCC0.USE THIS COLOR ON THE PARTS OF YOUR IMAGE THAT SHOULD BE TRANSPARENT.
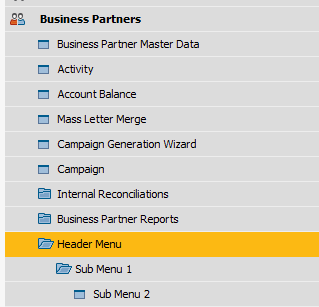
In the above example we have created a menu called Menu Header that contains a menu item called Submenu with a Submenu 2 under it. This is reflected by the screenshot below that shows the main menu after this window is updated.