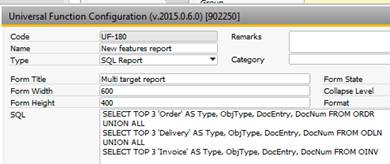
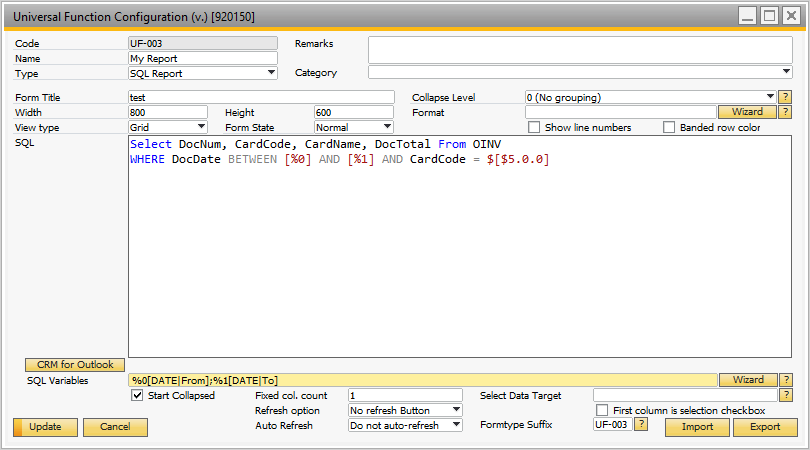
Using the SQL Report type, you are able to create your own reports or charts using SQL.
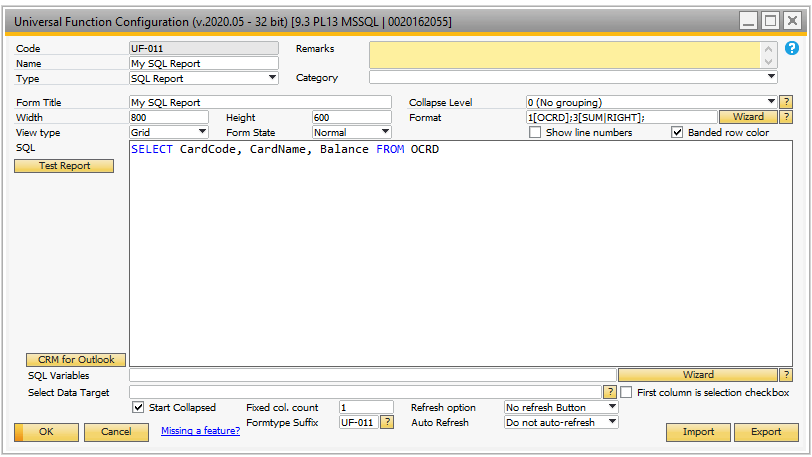
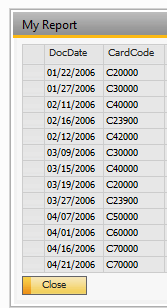
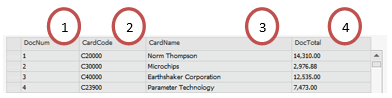
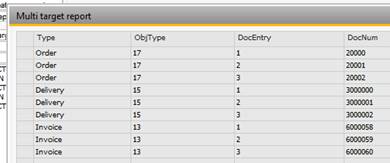
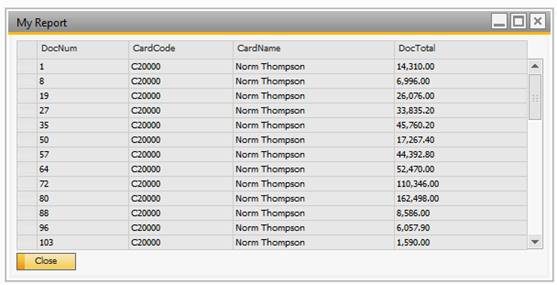
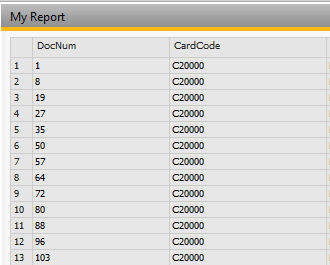
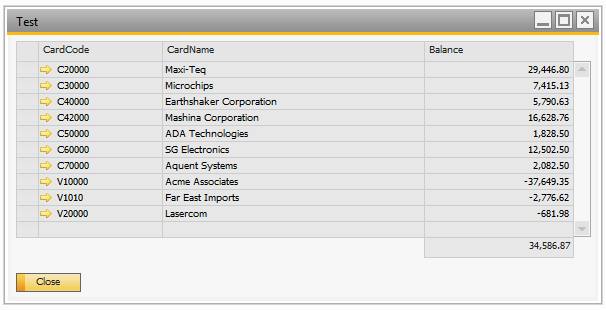
The above configuration results in the following report:
Field |
Description |
||||||||||||||||||||||||||||
|---|---|---|---|---|---|---|---|---|---|---|---|---|---|---|---|---|---|---|---|---|---|---|---|---|---|---|---|---|---|
Form Title |
Here you can define the title of the window showing. TIP: YOU CAN USE DYNAMIC SYNTAX AND SQL VARIABLES IN THE FORM TITLE TO GENERATE TITLES BASED ON INPUT |
||||||||||||||||||||||||||||
Form Width |
Where you can define the initial width of the window in pixels |
||||||||||||||||||||||||||||
Form Height |
Where you can define the initial height of the window in pixels |
||||||||||||||||||||||||||||
View type |
Where you can select if you want to display the report as a grid or a chart. Read more about using charts here: http://www.boyum-it.com/Link/B1UPCharting/
Tip: Instead of SQL Report Charting we instead recommend UF - Dashboard (More options and better usability) |
||||||||||||||||||||||||||||
Form State |
Where you can define the initial state of the window (Normal, Minimized, Maximized) |
||||||||||||||||||||||||||||
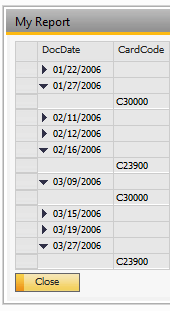
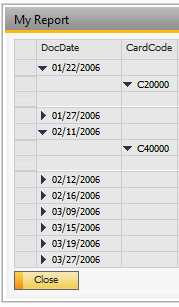
Collapse level |
The SQL Report has the option to create collapsible reports. Setting the collapse level is indicated by a number (Set Collapse level to 1 equals that column 1 is collapse-able and so on.)
|
||||||||||||||||||||||||||||
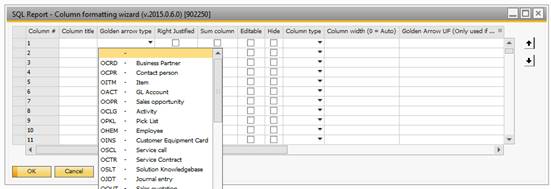
Format |
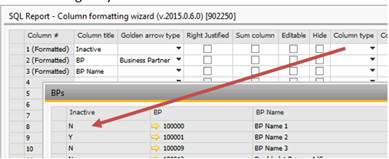
When you run the SQL Report, you will get a report with all data shown in plain text, left-justified. Using the Format field, you have the option to make minor changes to the design. In order to define the Format, press the wizard button
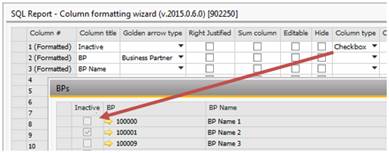
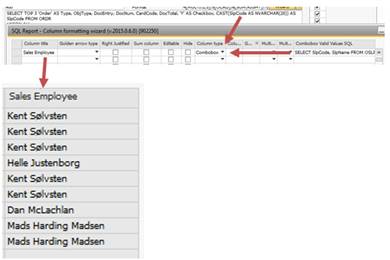
Here you can define formatting of each of the column of the report:
|
||||||||||||||||||||||||||||
Test Button |
With this button you can test you new SQL Report. Simply press it to see the SQL Report Button.
Warning there are a few limitations for the button:
•You SQL needs to be in OK Mode before it work •If you SQL Report use Dynamic Syntax it can't be tested from here (since the referenced field in the dynamic syntax is not present). You will instead need to test on the intended screen |
||||||||||||||||||||||||||||
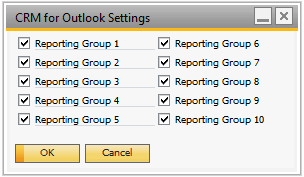
CRM for Outlook button |
This button brings up the CRM for Outlook settings. This is where you define what reporting group this SQL report should belong to.
|
||||||||||||||||||||||||||||
SQL |
Here you write the SQL that creates the data for the report. TIP: YOU WILL BE ABLE TO USE DYNAMIC VALUES USING THE $[$<ITEM>.<COLUMN>.<TYPE>] FOR DYNAMIC VALUES FROM ITEMS AND $[<TABLE>.<FIELD>.<TYPE>] FOR DATA SOURCES (AS DESCRIBED IN THE VALIDATION CONFIGURATION) |
||||||||||||||||||||||||||||
SQL Variables |
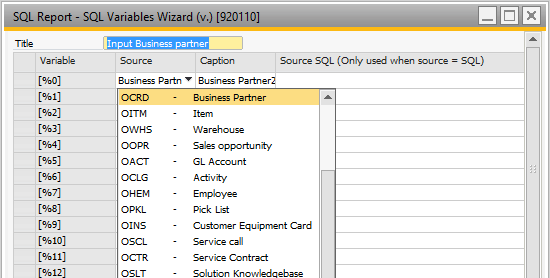
Here you have the option to define up to 20 SQL Variables ([%0], [%1], [%2], [%3] … [%19]). Compared to Formatted Searches we need to have defined the variables type and description. In order to define the variable sources, press the Wizard button.
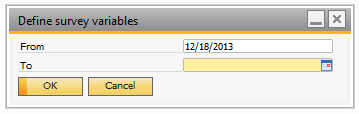
Alternative you can define the SQL Variables syntax manually: This is done by using the following syntax for each of the 20 variables: %<id>[<type>|<description>]; If you wish to use the variables, then you can format each by changing the syntax. The following types are possible • 0 (treat as string) • STRING (as above) • INTEGER (treat as a whole number) • NUMBER (treat as a number with decimals) • DATE (treat as a Date) • YES_NO (combo box with a Yes and No value (Yes is default)) • NO_YES (combo box with a No and a Yes value (No is default)) • Tableid from one of the following to create Choose from Lists: o Business Partner (OCRD), Items (OITM), Warehouse (OWHS), Sales Opportunity (OOPR), GL Account (OACT), Activity (OCLG), Employee (OHEM), Picklist (OPKL), Customer Equipment Card (OINS), ServiceCall (OSCL), Service Contract (OCTR), Solution Knowledge Base (OSLT), Journal Entry (OJDT), Sales/Purchase Documents (OQUT, ORDR, ODLN, ORDN, OINV, ORIN, ODPI, OPOR, OPDL, ORPD, OPCH, ORPC, ODPO), Incoming Payment (ORCT), Outgoing Payments (OVPM), Goods receipt (OIGN), Goods Issue (OIGE), Production Order (OWOR), Project Codes (OPRJ), Campaign (OCPN). • Tableid from one of the following to create a combo box with their data o Item groups (OITB), Sales Employees (OSLP), Shipping types (OSHP), Activitytypes (OCLT), BP Groups (OCRG), BP Groups - Customers (OCRG_C), BP Groups – Suppliers (OCRG_S), BP Priorities (OBPP), Budget distributions methods (OBGD), Countries (OCRY), Currencies (OCRN), Customs groups (OARG), Distribution rules (OOCR), Dunning terms (ODUT), Freight codes (OEXD), Holidays (OHLD), Indicators (OIDC), Inventory Cycles (OCYC), Languages (OLNG), Length and Width UOM (OLGT), Manufactures (OMRC), Payment Methods (OPYM), Payment Methods – In (OPYM_IN), Payment Methods – Out (OPYM_OUT), Payment Terms (OCTG), Pricelists (OPLN), Territories (OTER), Users (OUSR), Weight UOM (OWGT) • SQL:SELECT <VALUE>,<DESCRIPTION> FROM <TABLE> (treat as combo box with the values from the SQL written). EXAMPLE 1: IF VARIABLE 0 SHOULD BE OF TYPE DATE AND WITH THE DESCRIPTION "FROM DATE" THE SYNTAX OF %0 SHOULD BE %0[DATE|FROM DATE]; EXAMPLE 2: IF VARIABLE 3 SHOULD BE OF TYPE INTEGER AND WITH THE DESCRIPTION "DOCUMENT NUMBER" THE SYNTAX OF %3 SHOULD BE %3[INTEGER|DOCUMENT NUMBER]; JUST LEAVE THE SYNTAX OF UNUSED VARIABLES SINCE IT ARE IGNORED Once defined and used in a SQL Report, you will instead of a direct result get a "Define survey variables" window where you enter the prompted data. As shown in this example:
As you can see in the above configuration we use [%0] and [%1] to get a from and a to date. Running the SQL Report will before the result give us the following window where we can enter the from and to date defined (%3, %4 and %5 is not shown since they are not used):
Upon pressing the OK button, we get our result as normal based on the entered from and to dates.
|
||||||||||||||||||||||||||||
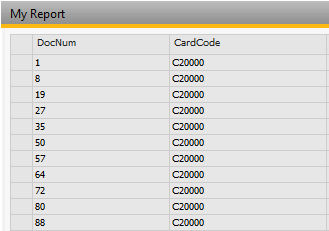
Banded row color |
With this option you can define if every second row should have color
NB: DUE TO TECHNICAL LIMITATIONS BANDED ROW COLORS CAN’T BE USED IN COMBINATION WITH COLLAPSE LEVEL (WILL NOT COLOR SUB-LEVELS) AND COLUMN SORT (WILL NOT RE-BAND THE COLORS) |
||||||||||||||||||||||||||||
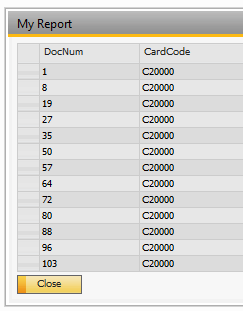
Show line numbers |
With this option you can define if there should be shown a line number on each row
NB: DUE TO TECHNICAL LIMITATIONS SHOW LINE NUMBERS CAN’T BE USED IN COMBINATION WITH COLLAPSE LEVEL, (WILL only number the rows there can collapse/expand) |
||||||||||||||||||||||||||||
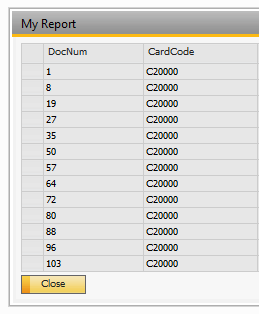
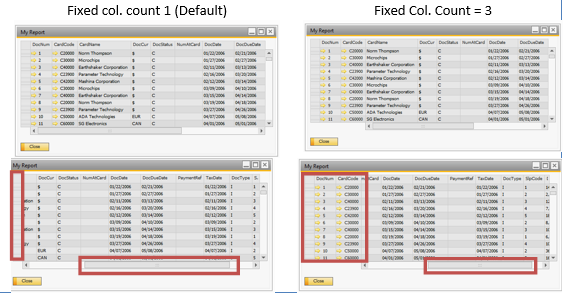
Fixed col. count |
This option allows you to have x of the first columns fixed so you can see them even if you do horizontal scroll
|
||||||||||||||||||||||||||||
Refresh Option |
Here you have the option to add a refresh-button to the Report. If you choose this option you can press the refresh-button on the report to re-run your SQL. |
||||||||||||||||||||||||||||
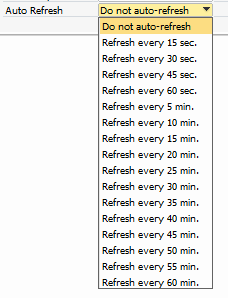
Auto Refresh |
With this option you have the ability to make the SQL you show auto refresh it data in a regular interval. This is handy if you have a display that "statically" show a report and need to update automatically.
|
||||||||||||||||||||||||||||
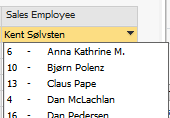
Select Data Target |
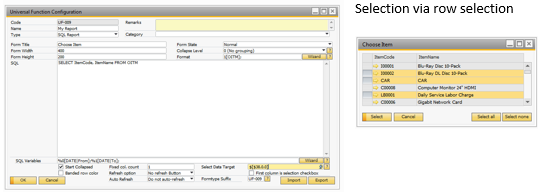
This gives you the option to turn your SQL report into an advanced selection-window and send data back to the window that opened it. If your target is a matrix and you select multiple lines, they will all be send to the matrix. The values sent back are based on the order of the columns. If you as example have an item code in column 1 and a target of $[$38.1.0] the item code will be transferred to the item column It is also possible to select multiple columns by specifying multiple targets separated by a “;”. If you as an example have a SQL result with an item code in column 1 and a price in column 2 you could specify the following, Select-target: $[$38.1.0];$[$38.14.CURRENCY]. This will result in the item code going to column 1 (item code) and the price going to column 14 (unit price). If you have a column that you do not wish to transfer, then simply add a “;” In the above example if you had an Item name between the item code and the price you Select-target should be $[$38.1.0];;$[$38.14.CURRENCY]
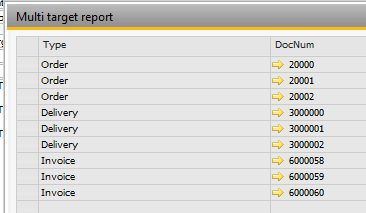
NB: Please note that the Select Back system have the following restrictions: •SELECTING MULTIPLE BACK IS ONLY SUPPORTED ON SALES AND PURCHASE DOCUMENTS + SAP Generated UDO's! •SELECTING MULTIPLE BACK TO BOM-ITEMS IS NOT SUPPORTED! •SELECTING ANY OTHER SINGLE DATA BACK CAN ONLY TARGET HEADER LEVEL FIELDS (aka Select Back to Grid like structures on other Add-ons or B1UP is not supported - This include example no support for selecting back to an UDT Handler.) NB: PLEASE NOTE THAT THE FIRST VALUE YOU SELECT BACK TO A MATRIX NEEDS TO BE THE PRIMARY FIELD OF THAT MATRIX THAT FORCE A NEW LINE. EXAMPLE: IF YOU WISH TO SELECTED BACK TO SALES ORDER LINES THE FIRST THING YOU NEED TO SELECT BACK NEED TO BE THE ITEM CODE (THAT WHEN SELECTED BACK WILL GENERATE A NEW LINE FOR NEXT ROW). IF IT IS NOT THAT YOU WILL GET A BAD VALUE ERROR SETTING THE VALUES. As you can see the normal Close-button is replaced by a select and a cancel button that allow you to select data. |
||||||||||||||||||||||||||||
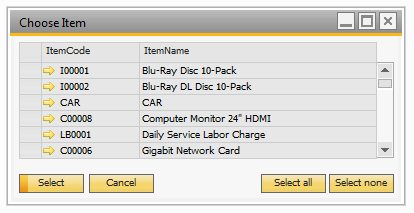
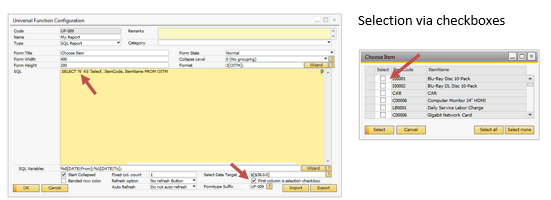
First column is selection checkbox |
Default select back system is by row-selection but in some cases people do not find this intuitive, want to have a default selection or want to select based on the value of value in an editable column. For that reason, you can turn the option to make the first column of the SQL be a Y/N value displayed as a selection checkbox.
NB: TO HAVE THE "SELECT ALL" BUTTON ON THE RESULTS WINDOW, THE "SELECTED DATA TARGET" FILED FROM THE UF CONFIGURATION WINDOW CANNOT BE EMPTY. NB: IF YOU USE THIS FEATURE, IT WILL IGNORE ANY SETTINGS IN COLLAPSE LEVEL SINCE SAP SDK CAN’T SHOW CHECKBOXES IN A COLLAPSED STATE. NB: Please note that if you make fields editable it is not possible to use the SAP Filter options (SAP Limitation) |
||||||||||||||||||||||||||||
Form Type Suffix |
This field can be used to ensure unique form types for each SQL Report. This allow you to add unique function buttons and other settings per report (or a group of reports if you give them same suffix). It is recommended to always have a suffix but for legacy reasons you can leave it blank
NB: Suffix will suggest the same as your code but due to people that wish to group reports and technical reason the prefix can max be 6 chars so if you write a code that is over 6 chars it will not reflect on the suffix
NB: If you need to add additional authorizations to an SQL was you can only have a 1 char suffix (else the total form type goes beyond 20 chars. The limit for the actual report is 4 chars) |