Formatted Search
|
Activate a formatted search like it would normally be done using SHIFT + F2. The first time you will need to define the formatted search. If you later need to edit the formatted search, hold down the ALT key while pressing the button. The result can be transferred to a specific field or column and identifiers can also be used. See sections below for more information about these options.
[See a video of the feature]
|
User defined menu (Legacy)
|
NB: User defined menu are in legacy mode. User defined menu will be maintained but will not provide new features in the future. (We recommend using a Universal Function of type Macro).
Enables you to activate any menu item in the SAP Business One, including other add-ons menu items, for example the XL reporter’s menu items. The menu items can be found using the “View > System Information” and hovering over each item using the top menu. The MenuUid should be entered in the Arguments field for the button
|
User Query (Legacy)
|
[NB: The function is a legacy function. It is fully functional but we instead recommend that you use SQL Reports]
Enables you to activate a user query in the database. (Use this for the user queries instead of the User defined menu
because the menu Uid of a user query is not static)
Since there is no place in the client where you can find the true id of a user query you will need to use the following SQL sentence to find the key (Called Internal Key (Fieldname: IntrnalKey)).
MSSQL:
SELECT T0.IntrnalKey, T0.QName, T1.CatName FROM OUQR T0 JOIN OQCN T1 ON T0.QCategory = T1.CategoryId WHERE T0.QCcategory != -2 ORDER BY T1.CatName, T0.QName
HANA:
SELECT T0."IntrnalKey", T0."QName", T1."CatName" FROM "OUQR" T0 JOIN "OQCN" T1 ON T0."QCategory" = T1."CategoryId" WHERE T0."QCategory" != -2 ORDER BY T1."CatName", T0."QName"
Once you have the key, provide it in the arguments field for the button, and it should work.
|
Opportunity
|
Opens the Opportunities. In special windows, like the Business Partner Master data window, it will draw the BP-code to the new opportunity so you do not need to type it yourself.
|
Blanket Agreement
|
Opens the Sales/Purchase Blanket Agreement. In special windows, like the Business Partner Master data window it will draw the BP-code to the new Agreement so you don’t need to type it yourself. If unable to determine a type, the add-on will ask you which type you want to open.
|
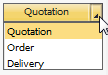
Quotation
|
Opens the Sales/Purchase Quotation. In special windows, like the Business Partner Master data window it will draw the BP-code to the new Quotation so you don’t need to type it yourself. If unable to determine a type, the add-on will ask you which type you want to open.
|
Order
|
Opens the Sales/Purchase Order window. In special windows, like the Business Partner Master data window, it will check the type of the current BP and open the respected window type (Sales Order for Customers and Purchase Order for Suppliers). This will draw the BP-code to the new Sales/Purchase Order so you do not need to type it yourself. If unable to determine a type, the add-on will ask you which type you want to open.
|
Delivery/Goods Receipt PO
|
Opens the Delivery/Goods Receipt window. In special windows, like the Business Partner Master data window, it will check the type of the current BP and open the respected window type and draw the BP-code to the new window. If unable to determine a type, the add-on will ask you which type you want to open.
|
Return/Goods Return
|
Opens the Return/Goods Return window. In special windows, like the Business Partner Master data window, it will check the type of the current BP and open the respected window type and draw the BP-code to the new window. If unable to determine a type, the add-on will ask you which type you want to open.
|
Down Payment
|
Opens the Sales/Purchase Down Payment window. In special windows, like the Business Partner Master data window, it will check the type of the current BP and open the respected window type and draw the BP-code to the new window. If unable to determine a type, the add-on will ask you which type you want to open.
|
Invoice
|
Opens the AP/AR Invoice window. In special windows, like the Business Partner Master data window, it will check the type of the current BP and open the respected window type and draw the BP-code to the new window. If unable to determine a type, the add-on will ask you which type you want to open.
|
Credit Note
|
Opens the AP/AR Credit Note window. In special windows, like the Business Partner Master data window, it will check the type of the current BP and open the respected window type and draw the BP-code to the new window. If unable to determine a type, the add-on will ask you which type you want to open.
|
Activity
|
Opens the Activity. In special windows, like the Business Partner Master data window, it will check the type of the current BP and transfer it.
|
Incoming Payment
|
Opens the incoming payment window. In special windows, like the Business Partner Master data window it, will draw the BP-code to window so you don’t need to type it yourself (also determines type).
|
Outgoing Payment
|
Opens the outgoing payment window. In special windows, like the Business Partner Master data window, it will draw the BP-code to window so you don’t need to type it yourself (also determines type).
|
Posting Periods
|
Open the General Setting and set the focus on the Posting Periods tab-page.
|
Reconciliation
|
Open the Banking Reconciliation window.
|
Goods Receipt
|
Opens the Goods Receipt window. On special windows, like the Item Master Data, the active Item code will be draw onto the new window and be placed as a line so you do not need to type it yourself.
|
Goods Issue
|
Opens the Goods Issue window. On special windows like the Item Master Data the active Item code will be draw onto the new window and be placed as a line so you don’t need to type it yourself.
|
Inventory Transfer
|
Opens the Inventory Transfer window. On special windows like the Item Master Data the active Item code will be draw onto the new window and be placed as a line so you don’t need to type it yourself.
|
Last Price Report
|
Opens the Last Price Report window. On special windows, like the Item Master Data, the active Item code will be draw onto the new window for easy use.
|
Special Prices
|
Opens the BP Special Prices window. On special windows, like the documents and BP Master data, the BP code will be draw onto the new window for easy use.
|
Discount Groups
|
Opens the Discount Groups window. On special windows, like the documents and BP Master data, the BP code will be drawn onto the new window for easy use.
|
Aging
|
Opens the Aging. On special windows, like the documents and BP Master data, the BP code will be draw onto the new window for easy use.
|
Data launcher (Legacy)
|
NB: Data Launcher are in legacy mode. Data Launcher will be maintained but will not provide new features in the future. (We recommend using a Universal Function of type External Launcher).
Launch the Data Launcher which is a special function type with extended functionality.
|
External launcher Legacy
|
NB: External Launcher are in legacy mode. External Launcher will be maintained but will not provide new features in the future. (We recommend using a Universal Function of type External Launcher).
Launch an external program from the button which can be dependent on data from the window
Syntax: PROGRAM|ARGUMENTS (Example: winword.exe|”C:\test.doc” launch Microsoft Word and open the document in C:\test.doc)
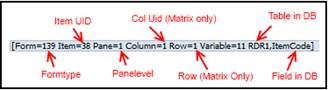
As an advanced feature, you are also able to get dynamic data from the active form. The syntax for referring to the parent form is $[$<item>.<column>.<type>]
Example: if you would like to have the BP-code as part of your data, you should write $[$5.0.0] since the item code text field on the Business Partner Master data have unique id 5, while if you would like the current address street name you should write $[$178.2.0] since the matrix Uid is 178 and the column is 2.
Commonly used configurations:
Configuration
|
Arguments
|
Start a Microsoft Word Document
|
- Program: winword.exe
- Parameters: $data (e.g. $data = “\\server\docs\test.doc”)
|
Start a Microsoft Excel document
|
- Program: excel.exe
- Parameters: $data (e.g. $data = “\\server\docs\test.xsl”)
|
Start Remote Desktop
|
- Program: mstsc.exe
- Parameters: /v $data (e.g. $data = 192.168.1.1)
|
Start a PDF-document
|
- Program: AcroRd32.exe
- Parameters: $data (e.g. $data = “\\server\docs\test.pdf”)
|
Start Internet explorer on a specific website
|
- Program: iexplore.exe
- Parameters: $data (e.g. $data = http://www.boyum-it.com)
|
|
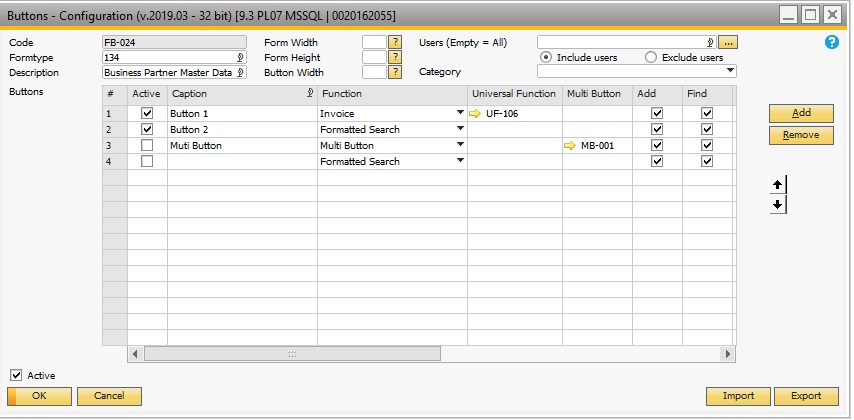
Universal Function
|
Enables you to activate a Universal Function from a function button. Which button to activate is chosen in the universal function field for the button (Press TAB to choose)
|
Multi Button
|
Enable you to create a button that instead of one function contains a drop-down of different functions.
(Read more about the Multi-buttons in the Multi-button section of the manual)
|
Do Nothing(B1 Validation System)
|
Create a button that does not do anything. This is included in order to allow the B1 Validation System to work with the function buttons
|